Browser compatibility
- Internet Explorer 9 or above
- Firefox
- Chrome
- Safari
- Edge
It does not work with the AOL browser so please do not use that.
Issues with Outlook
If you are using Outlook as your email system you may encounter the following problem. Outlook appears to classify the invite to confirm your email and the invitations to join a session as Junk.
If it does so you may have to retrieve the message from Junk first. Then do not click on the link in Outlook but copy the url into the address bar of your browser and click return or enter. This will enable you to confirm your email or enter a session without problems.
The Dashboard Screen
If it does so you may have to retrieve the message from Junk first. Then do not click on the link in Outlook but copy the url into the address bar of your browser and click return or enter. This will enable you to confirm your email or enter a session without problems
 On this screen you can change your:
- User name – This cannot have any spaces in it
- Real name
- Password
- Email address
- Nic name – which appears next to your icon in the chat room. Can be up to 10 characters long without spaces or commas
- If you want to subscribe to our mailings
- If you want to have ‘Send on return/enter key’ active in the chatroom
- The sound you want played when someone sends you a message
- The colour of your text in the chat log
- The avatar you want used for yourself. You can use one of the samples or upload your own.
Logging in
You will be asked for your ID and password and there is a link for forgotten passwords. You can find your ID from the email welcoming you to the system.
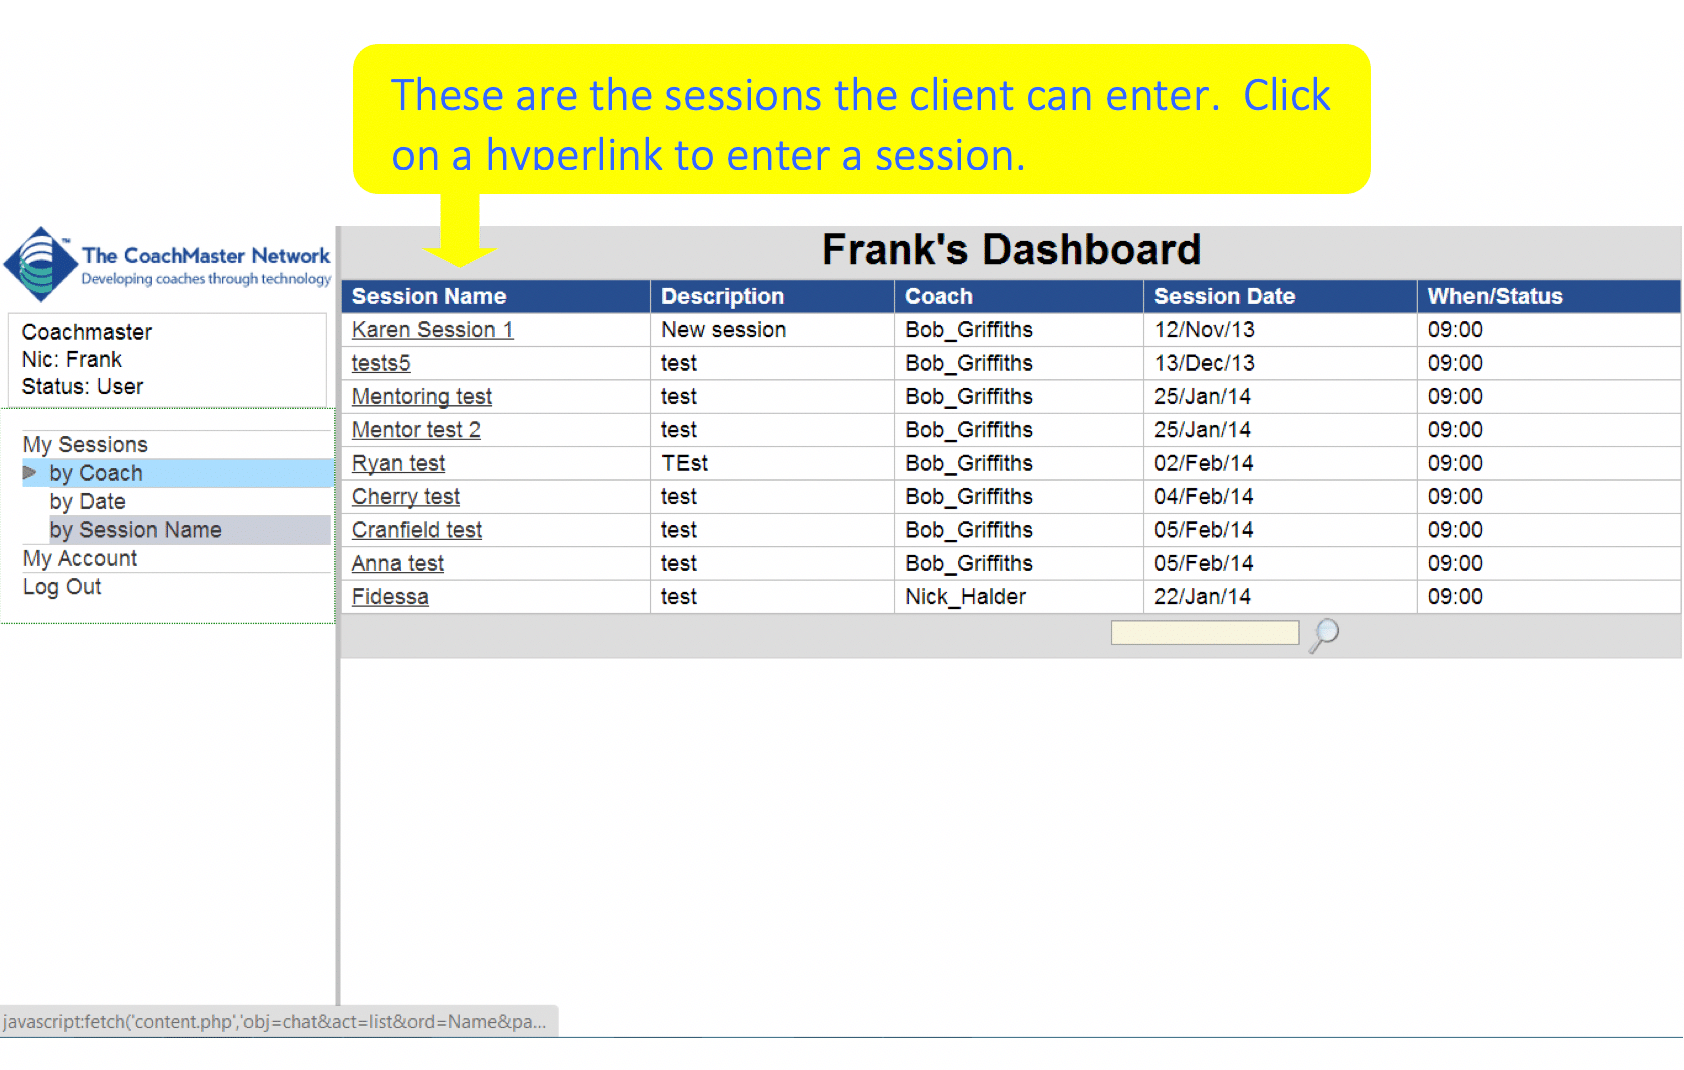
If you select My Sessions and you only have client level permission this is the screen you will see when you first log in.
If you have coach level permissions this is the screen you will see when you log in.
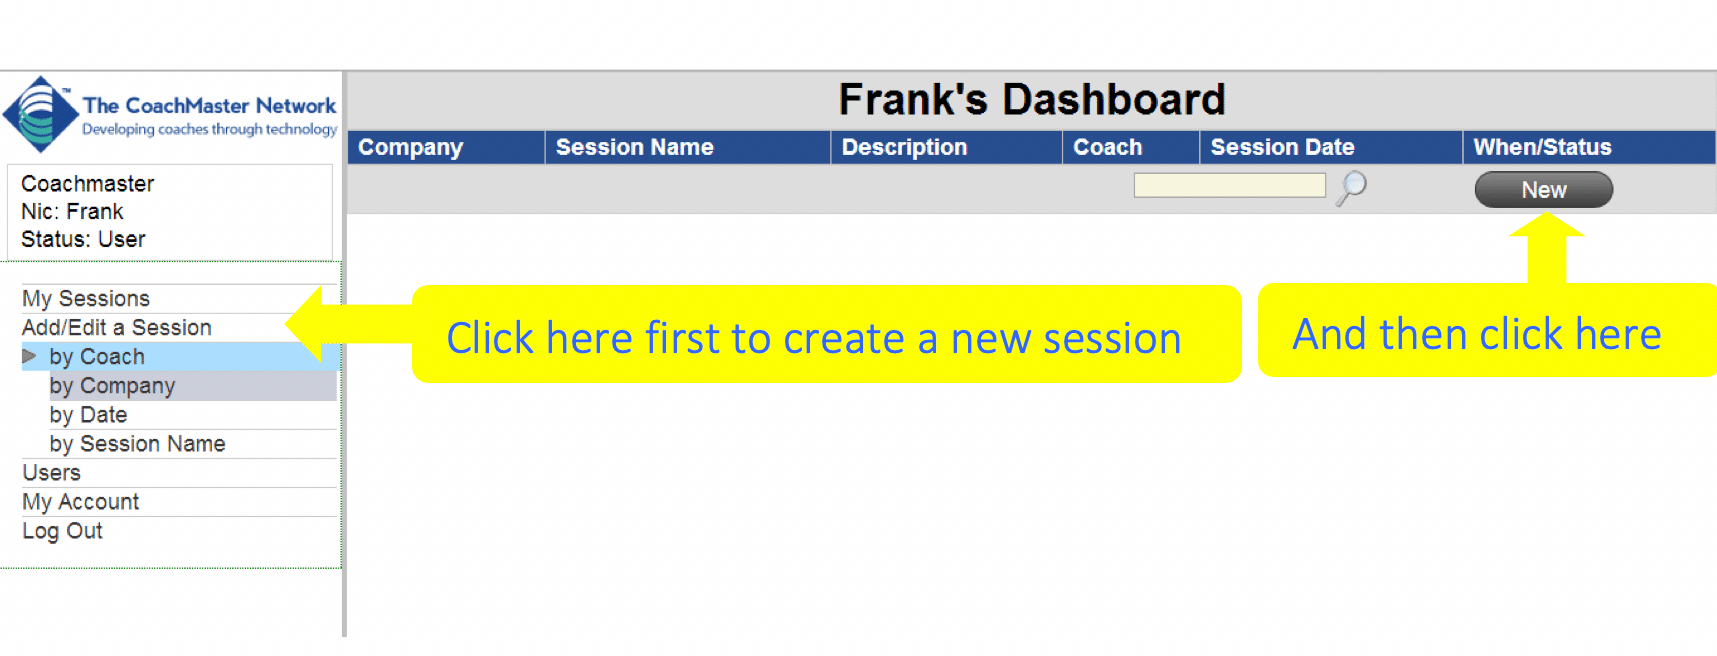
To create a new session as coach
As a coach to create a new session select ‘Add/Edit a Session’. Then click ‘New’
You will then see this screen which you can use to create a new session
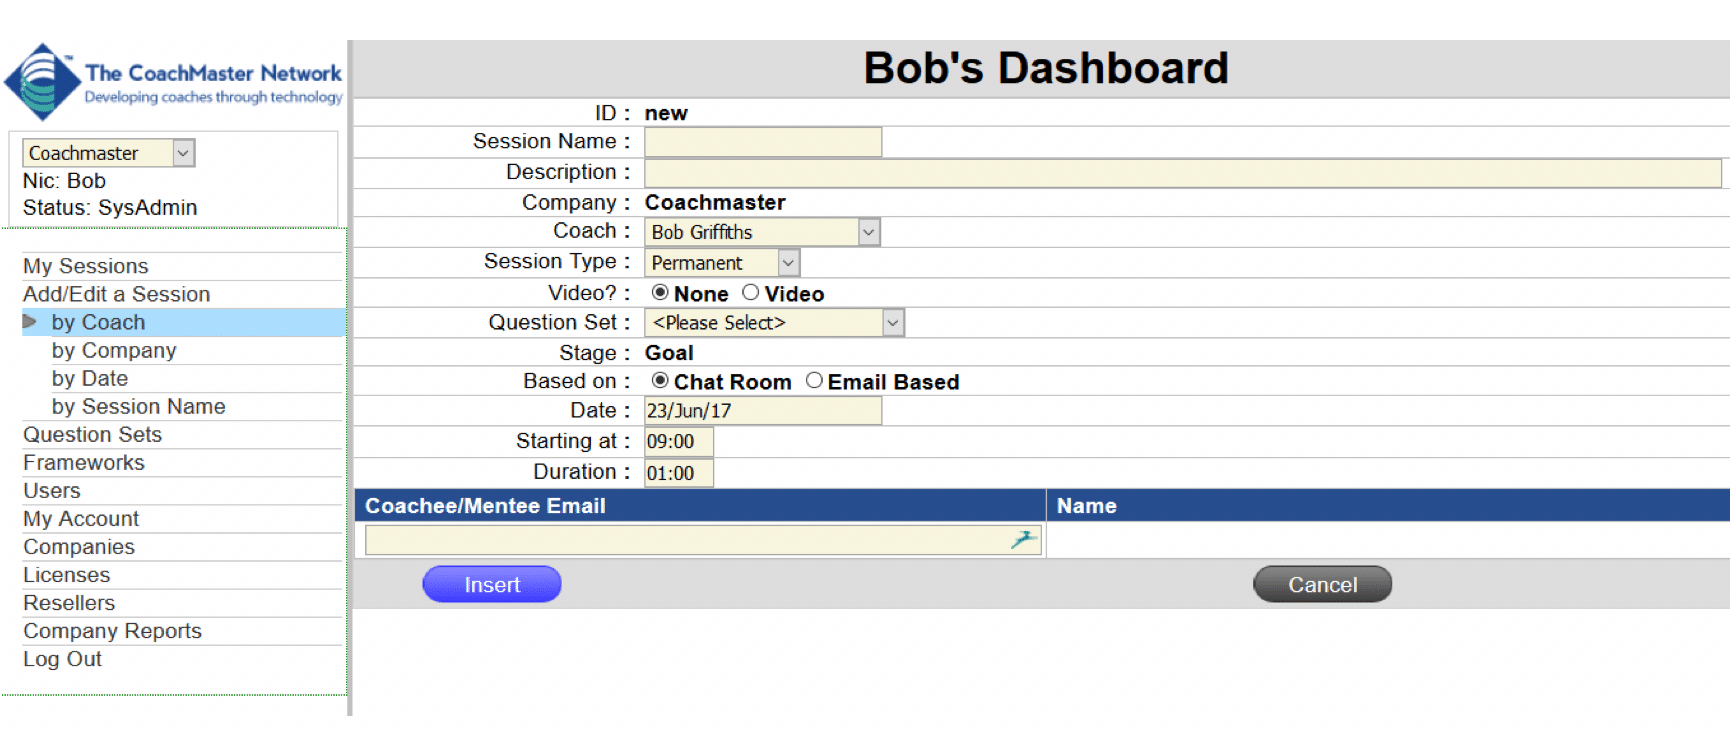
- Give the new session a name and description of your choice.
- Leave the ‘Type’ as ‘Permanent’.
- Select Video if you want to use the video and audio facility for the session. Select None if you just want to use text.
- Select the question set you want to use. The drop down list will only show the question sets which are available to you. If you are using the free version this will only be the generic ‘grow model’ question set.
- Leave ‘Based on’ as ‘Chat room’
- Select a date by clicking in the date box and using the drop down calendar. If you alter the time and duration for the session remember to include a colon between the hour and minute. The time, date and duration information is only used for the purposes of sending out the invitations and does not affect the actual CoachMaster™ sessions.
- Add in the emails of the coachee(s) and press ‘tab’
- Add in their name if they are not known by the system. This will trigger an invite for them to create their own account in the same way you were invited to join the system.
- Once you have added all the coachee(s) your want click ‘Insert’
- An option to ‘Send Invites’ to attendees will then appear and can be used to remind attendees of the session as many times as the coach wishes.
- The session will now be viewable and can be entered from ‘My Sessions’
If the coachee/mentee is not already on the system and does not log in and create a password within 24 hours the password will expire. To resend it select ‘Add/Edit a session’, click on the session you have set up with them, click ‘Edit’ and change any letter of their email to a capital letter. Then click ‘Save’. This will trigger the invite to create an account being resent to them.
If you wish to change the time of a session
The time of the session is only relevant for the invite function. Both coach and client(s) can go into any session at any time if the session is not marked as ‘completed’. Only the coach can change the session time.
To change the session time the coach should log in and select the ‘Add/Edit a session’ menu from the left hand side. Then select the session you wish to change from the list of sessions on the right hand side of the screen. Click ‘Edit’ and you can then change the date from the drop down menu and the time using the 24 hour clock. Click ‘Save’ and then you can resend out the invites.
If you wish to delete a session
To change the session time the coach should log in and select the ‘Add/Edit a session’ menu from the left hand side. Then select the session you wish to change from the list of sessions on the right hand side of the screen. Click ‘Edit’ and you can then change the date from the drop down menu and the time using the 24 hour clock. Click ‘Save’ and then you can resend out the invites.
You can test the system for yourself by running both coach and client sides yourself. There are slightly different instructions according to whether you are using one or two computers.
If you have access to two computers
- Create a client by entering an email account to which you have access to in the ‘Coachee’ box in the screen shot above. This has to be a different email to the one you have used for your main account
- Access that email on your second computer and you can then verify your email and enter the session that you have set up as coach
- You will then be able to see the coach side on one computer and the client on the other and test out the functionality of CoachMaster™.
If you are using only one PC or Mac
- Access the email you have sent the verification to. Copy the verification url to the address bar of another browser. For example, if you are using Internet Explorer for your main email program you should use Firefox, Chrome or Safari.
- You can then verify your email as client.
- You will then be able to see the coach side on one browser and the client side on the other.
- The key fact to remember is you have to use a different browser for the coach and client sides but only if you are running both on the same computer.
Please see the next page for instructions on how to run a coaching session using CoachMaster™.
Using CoachMaster™ to run a coaching session

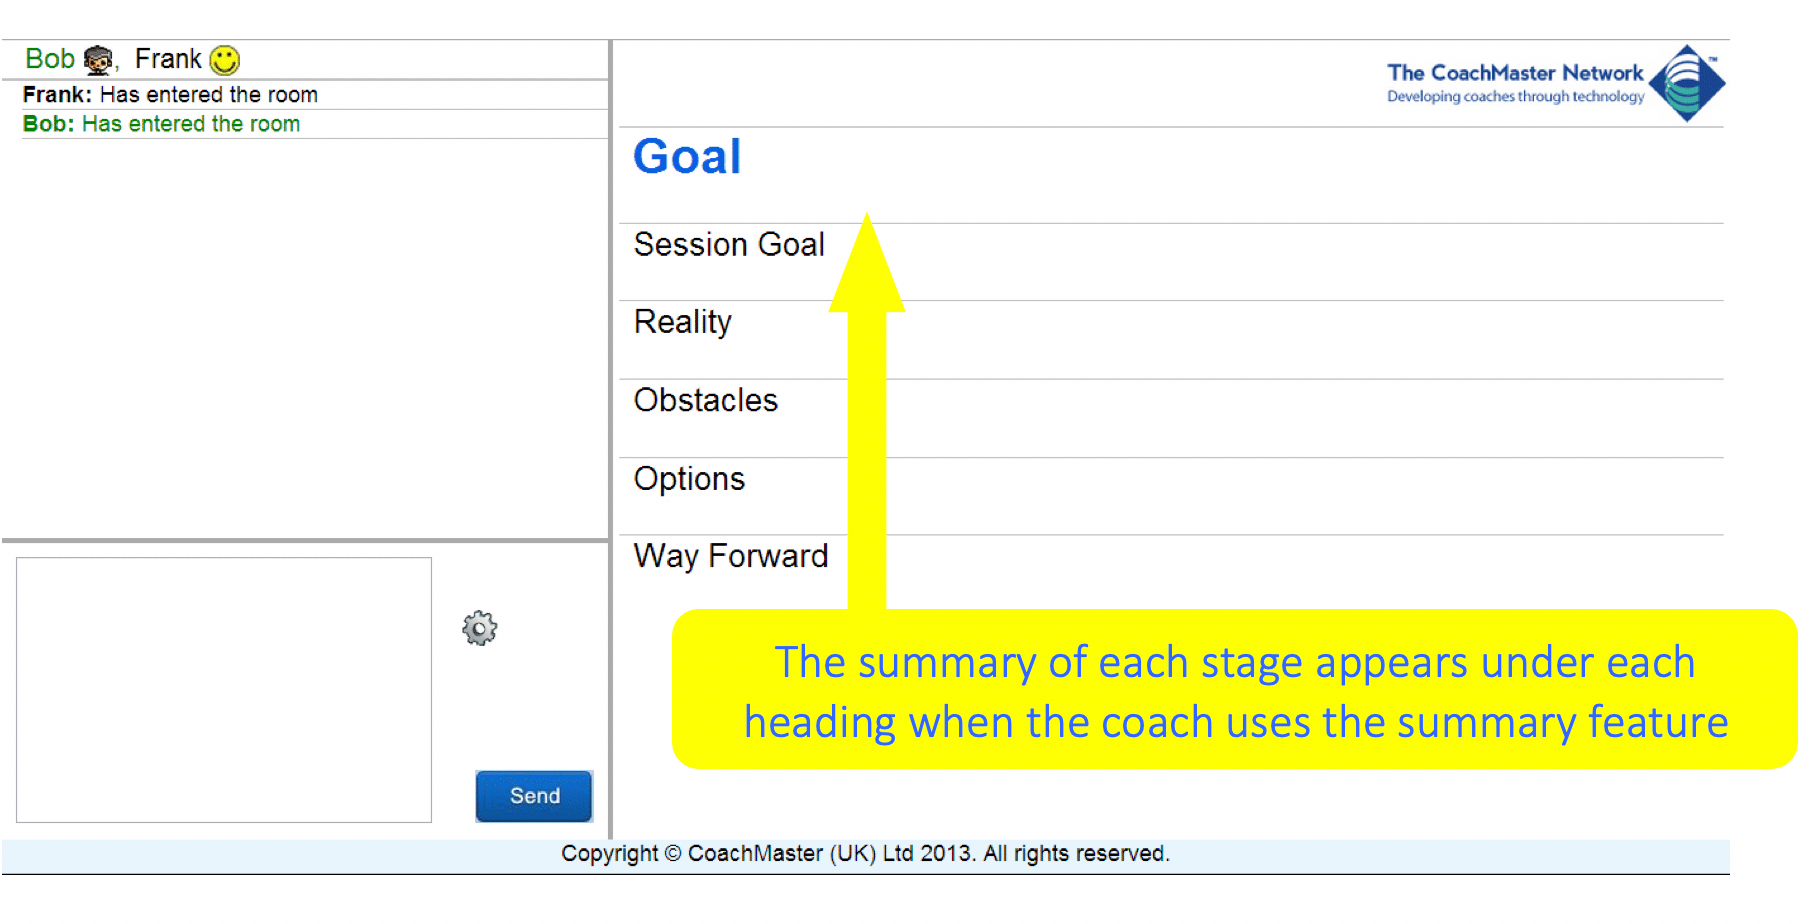
At the top left you have the name of the person who is the coach for the session and the person they are coaching. So in the above session Bob is coaching Frank. If you are coaching a team you would see each person’s icon.
In the central panel you have a number of vertical tabs which the coach uses to navigate between the different stages of the model you are using. To open the next one simply double click on it.
For each of the stages of any model there are different subsets of questions. Each subset has a hint at the top for the coach and sometimes there are additional hints in the questions.
Some sections might have reflective questions for the coach to think about for themselves before they start or after the session. These are not intended to be sent to the client.
2. Features of the client’s screen
3. How to run a Coaching Session using CoachMaster
The coach can click on an ‘Ask’ button to send a question to the input panel. Then it can be edited or free form text typed in. The coach then clicks on the ‘Send’ button to send the question to the client. The client sees the question on their screen, types their response and clicks on ‘Send’ button.
You are not restricted to only using text when coaching using CoachMaster™. Many people use CoachMaster™ for phone or video coaching or even face to face. If not using text the coach would use the questions as prompts and speak the questions to the client(s). It is then up to the coach whether they note down the questions they have asked or the client’s answers. We do recommend however that the coach keeps notes of the summaries of each section which can be automatically shared with the client(s).
You do not have to be online at the same time as your client(s). CoachMaster™ can be used in an offline mode where the coach can send a number of questions to the client(s). When the client(s) are ready they log on, see the questions and respond. The coach then sees their responses when they next log on. In this way a session is built up but more slowly than by instant chat.
4. Summarising a stage
Once the coach and client are satisfied that they have got as far as they need to in a particular stage the coach can select the appropriate summary tab on the bottom right and click on the pencil icon which will make the summary editable. Then the coach can select the text they want to use in the summary and copy it to the appropriate summary panel where it can be further edited.
If the summary of a particular stage changes as you go through the session e.g. if the goal seems too ambitious the coach can click on the appropriate tab and change the text by clicking on the pencil icon.
The coach then navigates to the next stage and a dialogue is built up for that stage. The same process occurs for all the stages until a session are completed and the client has created a series of actions they are confident will lead them towards their goal.
5. Changing a question set in mid-session.
You will then see this screen
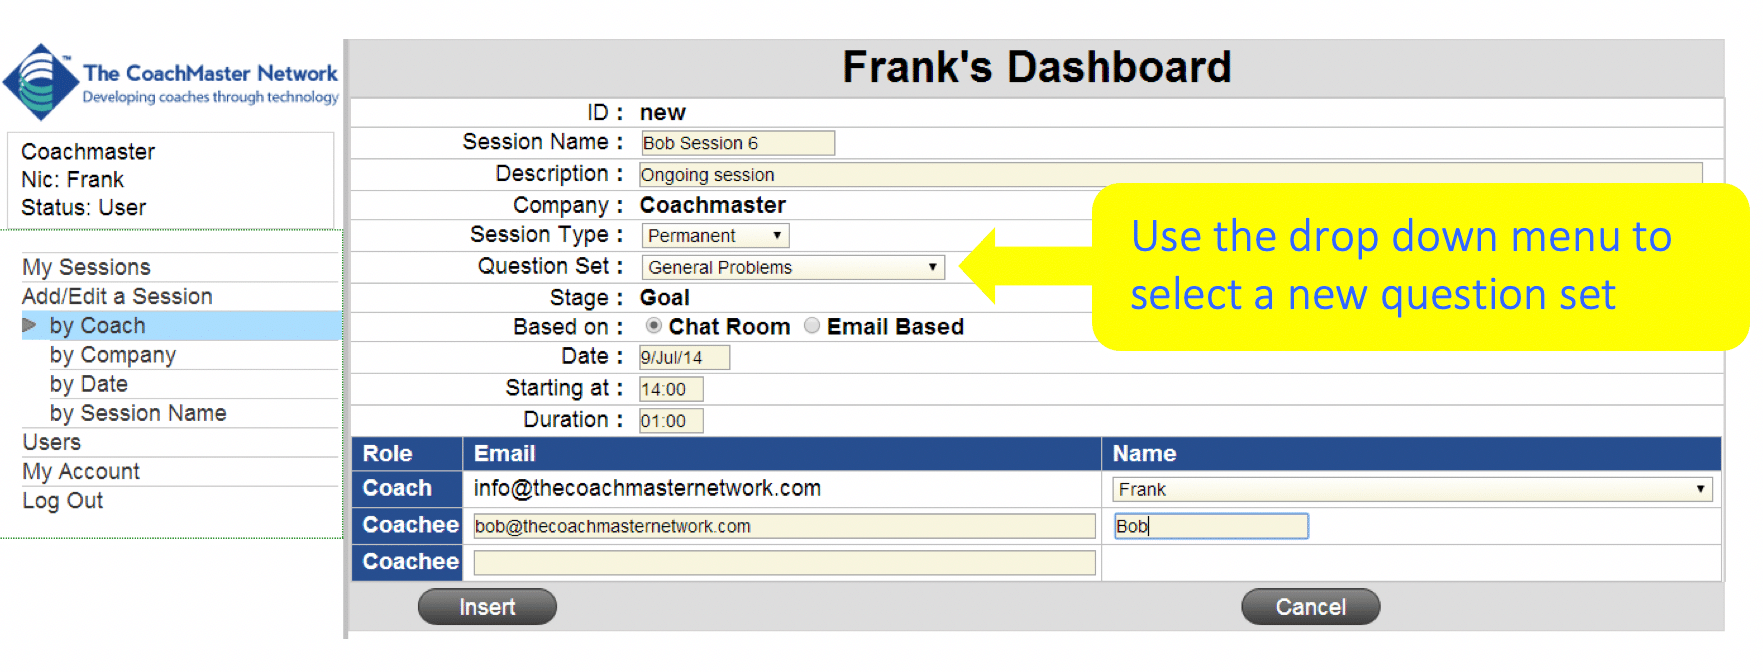
When you click the drop down menu you will see all the question sets you are entitled to use. If you want to change the question set select a new question set and click ‘Insert’.
If you now go back to the ‘Chat Room’ tab and do a refresh (Function key F5 or click in the address bar click the symbol or hit ‘Enter’ or ‘Return’ keys) the question set will change to the new one you have selected.